Table of Contents
How to Transfer Photos from iPhone to Mac
Here we will discuss how to transfer photos from iPhone to mac in simple and easy steps. As photo assortments develop, you may find Photos and Camera takes up the more significant part of your iPhone storage. Basically, in storage, it shows that photos possess 48 GB of my 128GB iPhone XR or even in iPhone Xs Max. As of now, moving all pictures and recordings to the computer for reinforcement and afterward erase them is a decent alternative to let lose the iPhone storage space.
How would I be able to transfer photos from iPhone to MacBook professional? Here in the following aide, we will zero in on how to share photos and recordings from iPhone to Mac computer, like iMac, MacBook Pro/Air, Mac Mini, Mac Pro in some fundamental ways.
Different Ways To Transfer Phots

Source – www.zoho.com
How would you be able to import photos from iPhone to Mac without iPhoto? You can have a take a stab at the expert iPhone photos transfer tool – iMobie AnyTrans. What’s more, beneath are its notable highlights on uploading iPhone photos:
AnyTrans – iPhone Photo Transfer
1-click to transfer pictures and recordings iPhone to the computer (Mac and PC).
Keep photos in original quality and efficient in albums.
Quick transferring speed significantly saves your time.
Get photos to your Mobile Phone without erasing.
On the off chance that you like as such, just Free Download AnyTrans on your computer right off the bat, and then follow the steps below to import iPhone photos to your Mac rapidly.
Choice 1: How to Import All Photos from iPhone to Mac at Once
Now you need to copy all the photos on your iPhone, similar to Camera Roll photos, Photo Stream photos, iTunes synchronized photos, iCloud sharing photos, and album photos, or some other explicit albums to Mac. Here’s how to do it.
Step 1: Download AnyTrans on your Mac. Then you Run it > Connect your iPhone to Mac by means of USB link > Click on “Device Manager” mode, and afterward pick the “Substance to Mac” choice.
Step 2: Uncheck the “Select All” crate > Check the photos albums contain the photos you need > Click on the “Following” button to begin transferring the selected photos to your Mac.
Step 3: After the cycle finishes, you can click the “View Files” button to check the transferred photos on your Mac.
Choice 2: How to Upload Multiple or Selected Photos from iPhone to Mac
On the off chance that you simply need to transfer some particular photos of some album to Mac instead of all the iPhone photos or the entire album, you can follow us to transfer numerous or selected photos from iPhone to Mac.
Step 1: Download AnyTrans on your Mac. Now, Connect your iPhone your system by means of a USB link > Click on “Device Manager” mode, and afterward, pick the “Photos” option.
Step 2: Choose the album > Pick photos you need to transfer > Click on the “To Mac” button at the top-right corner to move the selected photos to your Mac.
For iPhone 7 or later clients who need to convert HEIC to JPG, it would be ideal if you click the settings button to set it or to use bother free HEIC to JPG converter to change these photos to JPG design on your computer.
While syncing photos from iPhone to Mac with AnyTrans for iOS, you won’t lose any past photo on your iPhone.
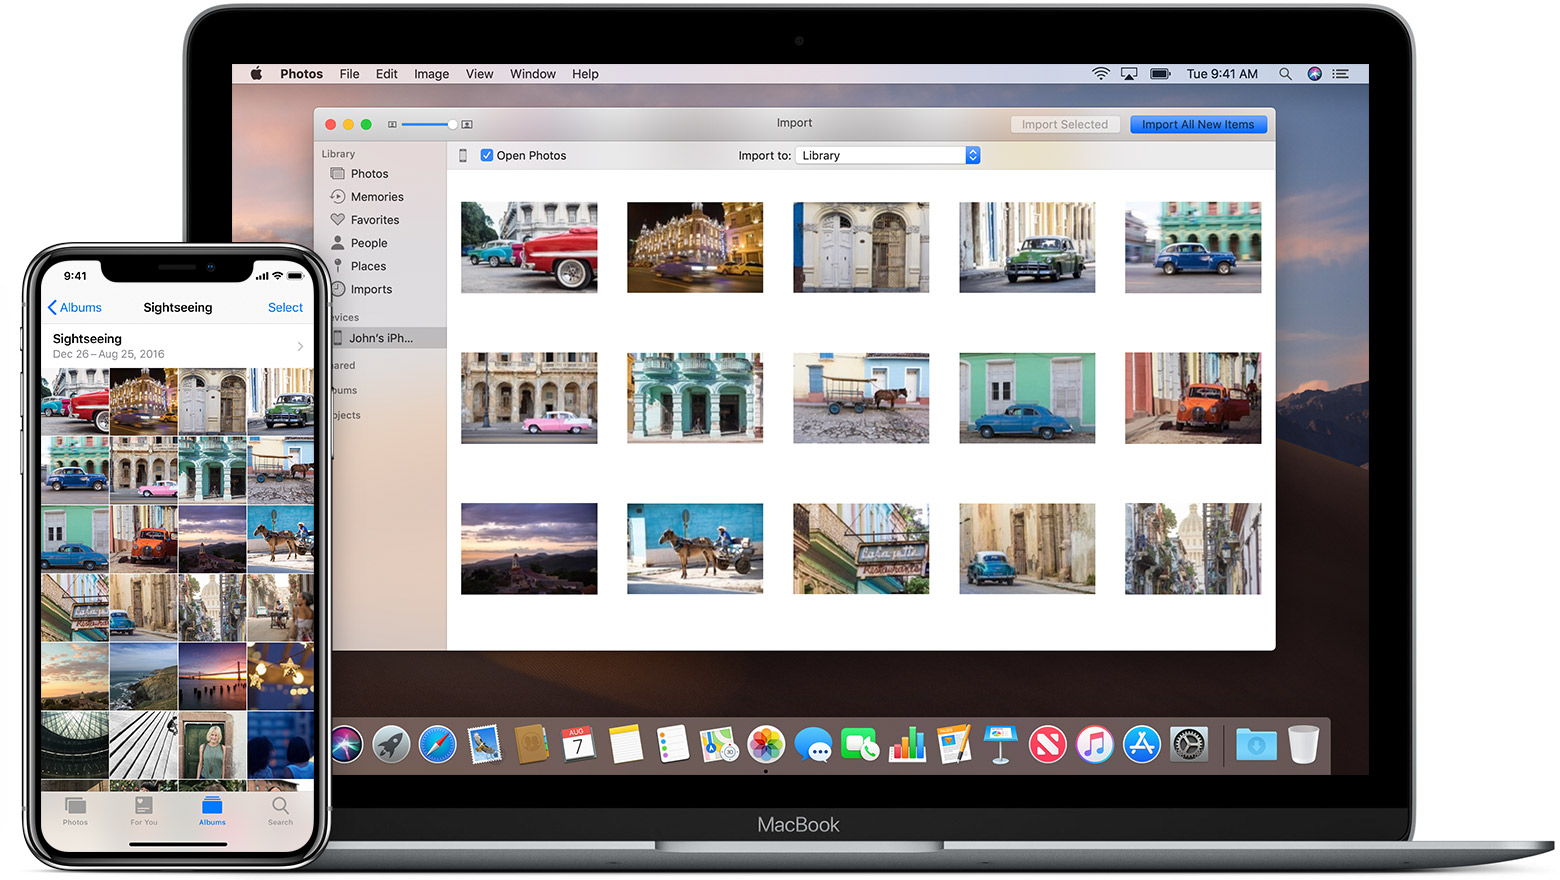
Import Photos from iPhone to Mac
You can use the Photos app to import iPhone photos, which replaces the old iPhoto and Aperture with an easier photo editor and library manager. It additionally can be utilized to transfer photos from iPhone to Mac, and here we’ll show you how to make it:
Connect to the computer with the USB link.
The Photos app on your Mac will launch.
Now, Import tab and select the photos you need to transfer to Mac.
You can click Import XX Selected to transfer photos to Mac.
For Mac OS X Yosemite prior, you can use the iPhoto feature on Mac.
Connect your iPhone simply with a USB link and afterward dispatch iPhoto on your Mac in the event that it doesn’t open automatically.
Select your iPhone photos. So you have to click Import.
Now, you can import all the iPhone photos or even one by one. You can include an Event Name for the imported photos previously or in the wake of importing.
Where are photos stored on my Mac?
At the point when you copy photos to your Mac with the Photos app, they are stored in the Photos library folder. Also, you can change the area to elsewhere like in a folder on your Mac or on an external drive, and still view them in Photos.
Here is the place to find photos stored in the Photos app: On your Mac, Go to Finder > Choose Pictures > Right Click Photo Library > Choose Show Package Contents > In a folder named Masters, you will find photos in various folders. Consider the possibility that my computer doesn’t perceive the iPhone. A portion of our clients reports that the iPhone can’t connect to the computer.
How would I AirDrop from iPhone to Mac?

On your iPhone, swipe up from the bottom of the screen to bring up the Control Center, and afterward tap the “AirDrop” button. You can likewise divert on AirDrop from Settings app > General > AirDrop. Select either “Contacts Only” or “Everybody,” depending on who you need to have the option to send the photos.
How to import photos to Mac with AirDrop:
On your iPhone, open the Photos app and find the photos you need to move to your Mac.
Guarantee you’re viewing the photos in thumbnail view and tap Select in the top right corner.
Pick the photos you need to send to your Mac (selected images appear with a blue checkmark).
At that point, tap the Share symbol (a square with an up bolt).
In the AirDrop area, tap the name of your Mac.
Acknowledge the photos on your Mac, and they will be saved into the Downloads folder on your Mac.
How to Sync Photos on iPhone and Mac with iCloud
iCloud Photos is Apple’s online photo storage administration. At the point when you enact iCloud Photos, all your iPhone photos get stored in iCloud so that you can view and download them from your Mac. Note that you should be signed in with a similar Apple ID on your iPhone and Mac or Apple Watch. Here is how to match up iPhone photos to Mac with
iCloud:
On your Mac, click the Apple symbol at the top left of the screen. At that point, go to System Preferences > Choose iCloud.
Check the case close to the iCloud Library.
On your iPhone, go to Settings and then Photos. Now, Ensure iCloud Photos is on.
Transfer Photos from iPhone to Mac with the help of Image Capture
Follow the steps-
Connect your iPhone to Mac with USB link > Run Image Capture on your Mac.
Select your iPhone in the list the event that it isn’t selected > Set the yield folder for your photos.
Click on Import photos from iPhone to Mac.
Send Photos from iPhone to Mac with the help on an Email ID
When you need to transfer a few photos from iPhone to Mac and your Mac isn’t at your hand, Email turns into an excellent choice.
Here is the answer to how to transfer photos from iPhone to Mac with the help of an email ID.
Run Photos App on your iPhone and now go on Albums to open Albums Page > Choose the objective album.
Click the Edit button and Pick up the photos you need to transfer > Tap on the Share button and pick Email.
Type your Email address. Now, Tap on Send > Sign in your Email on Mac and download those pictures and store them on Mac.
Transfer Photos from iPhone to Windows PC
There are likewise numerous approaches to transfer iPhone photos to PC, and using the Windows default Photos app is one of the great ways. Here is how you can transfer iPhone photos to computer by means of Photos (windows 10/8):
Connect your iPhone with the USB link.
The Photos app ought to automatically dispatch. On the off chance that it doesn’t, post it from the Windows Start menu.
Click the Import symbol in the upper right corner of the Photos app.
Once you click on, it will begin searching for photos on your iPhone.
From that point forward, pick photos to import to your computer.
To get more ways and subtleties on how to transfer iPhone photos to Windows PC, you can move to this guide:
How to Transfer Photos from iPhone to Computer (Windows).
Moreover, in the event that you need to transfer photos from Mac back to your iPhone, simply allude to How to Transfer Photo from Mac to iPhone >
iPhone has taken HEIC as the format of its photos, as this new configuration is more effective regarding storage space. However, HEIC isn’t generally viable, particularly on Windows PC. If you experience difficulty while opening HEIC photos on your computer and need to convert HEIC photos into different formats. For example, JPG, PNG, JPEG, and so on, you can attempt a free tool – iMobie HEIC Converter.
The Bottom Line
In spite of the fact that you can get seven or considerably more approaches to transfer photos from iPhone to your iMac, MacBook Pro/Air, Mac Mini, or Mac Pro, most of them just help to export Camera Roll photos. On the off chance that you need to transfer photos stored on different albums. You need to search for further arrangements. Much the same as the table above shows, with regards to moving and managing iPhone photos, AnyTrans for iOS can be the ideal decision to use the link https://www.wallpics.com.


 Mandatory and What Does It Cover?")

